Create a ChatBot with OpenAI and Gradio in Python
Last Updated :
24 May, 2023
Computer programs known as chatbots may mimic human users in communication. They are frequently employed in customer service settings where they may assist clients by responding to their inquiries. The usage of chatbots for entertainment, such as gameplay or storytelling, is also possible.
OpenAI ChatGPT has developed a large model called GPT(Generative Pre-trained Transformer) to generate text, translate language, and write different types of creative content. In this article, we are using a framework called Gradio that makes it simple to develop web-based user interfaces for machine learning models. GPT-3-powered chatbots may be developed with Gradio.
This article will demonstrate how to use Python, OpenAI[ChatGPT], and Gradio to build a chatbot that can respond to user input.
Required Modules
pip install openai
pip install gradio
Steps to create a ChatBot with OpenAI and Gradio in Python
Here we are going to see the steps to use OpenAI in Python with Gradio to create a chatbot.
Step 1: Log in to your OpenAI account after creating one.
Step 2: As shown in the figure below, after logging in, select Personal from the top-right menu, and then select “View API keys”.
Step 3: After completing step 2, a page containing API keys is displayed, and the button “Create new secret key” is visible. A secret key is generated when you click on that, copy it and save it somewhere else because it will be needed in further steps.
Step 4: Import the openai, gradio library, and then do as follows. Store the created key in the below-mentioned variable.
Python3
import os
import openai
import gradio
|
Step 5: Here we are getting the user chat history and storing it in a list and adding it to the previous state.
Python3
def message_and_history(input, history):
history = history or []
print(history)
s = list(sum(history, ()))
print(s)
s.append(input)
print('#########################################')
print(s)
inp = ' '.join(s)
print(inp)
output = api_calling(inp)
history.append((input, output))
print('------------------')
print(history)
print(history)
print("*********************")
return history, history
|
Step 6: Now we create the header for the gradio application and we are defining the gradio UI Submitting the input we are changing the current state of the Chatbot.
Python3
block = gradio.Blocks(theme=gradio.themes.Monochrome())
with block:
gradio.Markdown(
)
chatbot = gradio.Chatbot()
message = gradio.Textbox(placeholder=prompt)
state = gradio.State()
submit = gradio.Button("SEND")
submit.click(message_and_history,
inputs=[message, state],
outputs=[chatbot, state])
block.launch(debug = True)
|
Complete Code :
Python3
import os
import openai
import gradio
openai.api_key = "YOUR_API_KEY"
prompt = "Enter Your Query Here"
def api_calling(prompt):
completions = openai.Completion.create(
engine="text-davinci-003",
prompt=prompt,
max_tokens=1024,
n=1,
stop=None,
temperature=0.5,
)
message = completions.choices[0].text
return message
def message_and_history(input, history):
history = history or []
s = list(sum(history, ()))
s.append(input)
inp = ' '.join(s)
output = api_calling(inp)
history.append((input, output))
return history, history
block = gradio.Blocks(theme=gradio.themes.Monochrome())
with block:
gradio.Markdown(
)
chatbot = gradio.Chatbot()
message = gradio.Textbox(placeholder=prompt)
state = gradio.State()
submit = gradio.Button("SEND")
submit.click(message_and_history,
inputs=[message, state],
outputs=[chatbot, state])
block.launch(debug = True)
|
Output:
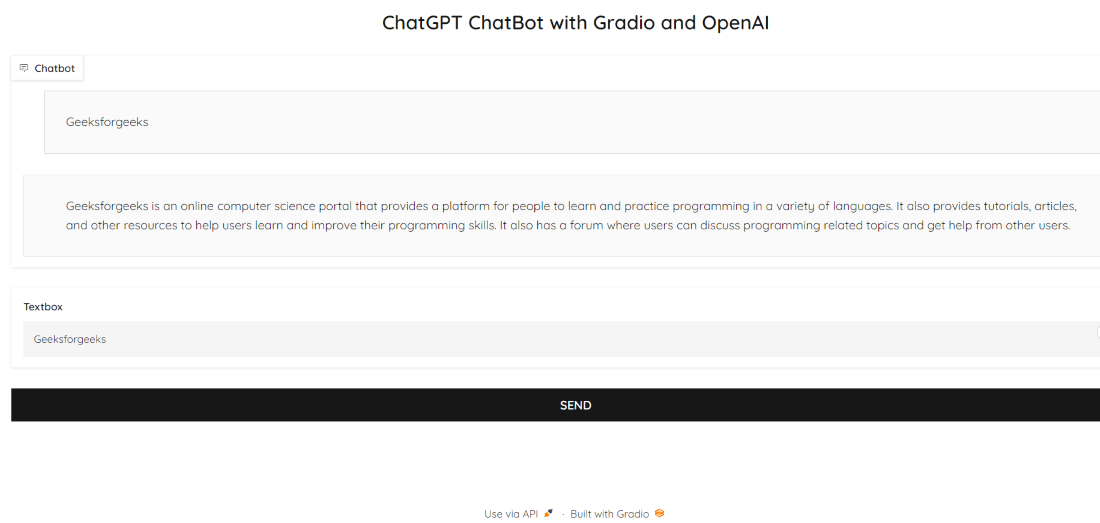
Gradio OpenAI
Conclusion
We covered several steps in the whole article for creating a chatbot with ChatGPT API using Python which would definitely help you in successfully achieving the chatbot creation in Gradio. There are countless uses of Chat GPT of which some we are aware and some we aren’t.
To learn more about Chat GPT, you can refer to:
Like Article
Suggest improvement
Share your thoughts in the comments
Please Login to comment...